* The lab 3 and 4 submittion e-wall paper is uncomplete. After i submitted that one i have do some changes in it. I explained in this blog entry.*
I consultant our digital media lecturer, Mdm Lydia regarding my previous work ( refer to my third blog post--- LAYERING). The comments i received is the building too messy ~courses need not be showed out ~ No effort is done to my text.
Mdm Lydia also prefer creative image compare to FOM building. After 4 classes ~ i learned more abt Photoshop.
Therefore, I change my previous design. At first i have no idea how to change my e-wall paper. I decided to google image : PHOTOSHOP OPEN DAYs.
Then i found a image that able to generate alot of idea for my e wall paper. That image i found is only provided raw materials but not the steps on how to do it. I referred to the E-books and GOOGLE whatever i dun understand.
Finally i found few tutorials that help me a lot towards this creation of e-wall paper. ( Reference is attached bottom of this post )
1) I throw away all the buildings and the paper that written course offered. ( just like below)
 |
| Deleted the building and hide the date and time. |
2) I found some new raw images. I selected it using selection tools.
 |
| I need the floor texture. |
 |
| The books |
 |
| I need the grass of this picture. |
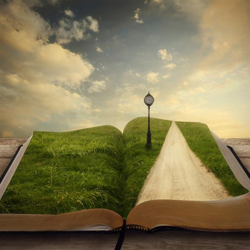 |
| I plan to have something like this. |
3) At first, i select out the floor and also the book. Then, placed it on my e wall paper. Just like below.
 |
| Before |
4) Then i used rectangular marquee to select a portion of the grass. I the layer above the book the turn the opacity to 50% so that it can see through the book.
Then, i click on the book layer and used quick Selection tool to select the book den i click on the grass layer. I select inverted, and delete the grass surrounded the book.
Change back the grass opacity to 100. Then i used, Polygon Lasso Tools to remove the side edges made is more like the pages of the book.
I used Filter > Liquidfy > Forward wrap tools ( to made like got the feel of open book )
Finally i use the Burn tools to put some shadow on the middle line of the book. I also used the Dodge Tools to highlight few areas. ( Reference for this is attached below.)
 |
| Final Result |
5) Right after steps 4, i added some images that have the 3D perspective view on the book. I found a girl jumping happily picture, a roadsign, a girl studying and a tree. I selected out using selection tools~ i use almost all the selection tools ~ i explore myself on the selection tools so difficult to explain here.
 |
| Girl Jumping |
 |
| Road Sign |
 |
| Girl reading |
 |
| Tree |
6) I rearrange those raw materials state at step 5, i do some retouching skills to enhance my e-wall paper.
I used burn tools to made some shadows of those images. I also use the blending options to drop shadows of the images. The road sign i decided to put FOM, FOE, FCM on it.
Therefore i used text tools to type out the text. I did some blending on those words made it more 3D and more obvious.
Then transform> scale / skew / rotate ... the words made it like written on the road sign.
At first i wanted to use the filter > vanish point, then select the text then delete it ( so that my vanish point page only show the ewall paper without text.) Right after i set the vanish point ( and there is a blue square) I pasted the words in it. Unfortunately, everytime i did that the photoshop programme will auto shut down.
I think is my computer cant support it. So, i used a more easy method (transform ) as i mention before. This is my result

7) I unhide all the layers. It like the images below ~ Mdm Chin said that course are not important and also the wording not special. So i did something towards the wordings.
 |
8) I deleted the courses text layer. I use the paper, scale it to the size or the word " FOM OPEN DAY" then i create clipping mask. The " FOM Open day" texture is the paper. I drop shadow on it made it more 3D style.
The wording at the bottom, i also create a clipping masks of flowers. Then i drop yellow shadow outside and inside. Then put some inner glow.
 |
| FINAL RESULT |
REFERENCES:
E-book uploaded at MMLS.
etc.


